

Running Containers on Cloudflare: Everything You Need to Know
A hands-on deep dive into Cloudflare’s new container platform - how it works, why it matters, and how to get started today


Unless you’ve been living under a rock, you’ve undoubtedly heard that Cloudflare is going to be offering support for container-based workloads starting this year.
During Birthday Week 2024, Cloudflare announced that they will be providing access to the container platform they have been using in production to run existing products such as Workers AI and Browser Rendering.
No definitive date was set for public access, but I’m excited that the time has come for all of you to take the container platform for a spin. I’ve had access during closed beta, so I’m here to tell you all about Cloudflare Containers: what are they? How do they work? And how can you get started?
This post assumes some basic understanding of Docker and containers.
What are Cloudflare Containers?
If you’ve used containers before, you’ll feel right at home with Cloudflare Containers. I use containers on a daily basis as part of my day job, and it was simple to get started with Cloudflare’s offering.
You can literally take a Dockerfile you have for an existing service and run that on Cloudflare, because it uses the things you likely already use. I’d say containers on Cloudflare are positioned as lightweight, ephemeral containers that are globally-distributed automatically, and will have auto-scaling built-in.
I’ve not used it myself, but my understanding is it’s pretty similar to Google Cloud Run based on some conversations with others. In effect, you create your container, and Cloudflare handles deploying and provisioning that container when needed. As I’ve come to expect with Cloudflare, the developer experience is incredibly simple, allowing you to offload as much as possible to Cloudflare’s platform.
Whether you’ve used Google Cloud Run, or deployed containers to EC2 instances via ECS on AWS, there are some key differences to keep in mind.
For starters, there’s no persistent storage at launch. With ECS for example, you can attach EBS storage that survives the container being restarted. With Cloudflare, you do have access to the file system, but any data will be lost when the container is stopped.
On the plus side, containers are deployed globally automatically by Cloudflare, ensuring they are spun up close to the end user, which reduces latency compared to single-region deploys of Cloud Run and EC2. You can deploy to multiple regions, but you'd need to handle orchestration yourself.
Cloud Run has recently released multi-region deploys in beta, but you then need to setup load balancing too, so it’s not as effortless as with Cloudflare
This isn’t the only benefit, as it also prevents your containers being taken out by a single region going down. If that were to happen, Cloudflare would just spin up your containers in another region, a big win for fault tolerance and disaster recovery.
Enjoying the article and want to get a head start developing with Cloudflare? I’ve published a book, Serverless Apps on Cloudflare, that introduces you to all of the platform’s key offerings by guiding you through building a series of applications on Cloudflare.
Buy now: eBook | Paperback
Cloudflare Containers Use Cases
As with all pieces of technology, they are often targeted at certain use cases, and Cloudflare Containers are no different. Cloudflare already has Workers, Durable Objects, SQLite databases in the form of D1, blob storage with R2 and much more.
If you want to build a standard SaaS application that primarily handles CRUD operations, host a blog or build an API, you’re going to want to reach for the existing tools, as they excel at that task and similarly globally distribute your application.
However, due to the runtime that Workers operate in, which is limited to 128MB of memory, and only offers a Node-like environment, there are workloads that simply don’t fit with a Worker.
For example, let’s say your application allows users to upload videos that are then served to other users. You want to serve different formats based on the end user’s device, so you need to re-encode the uploaded video. The most common library for video encoding is FFmpeg, but it’s written in C, and naturally won’t run on Workers. Even if it did, 128MB of memory isn’t enough for such a task.
This is a perfect use case to reach for a container on Cloudflare. You can deploy containers running FFmpeg, spin up the containers as needed to handle demand, and let Cloudflare worry about deploying and provisioning them.
Besides that use case, Workers only run natively with JavaScript, TypeScript and Python. You can deploy other languages using WASM, but this requires a little more setup and you’re ultimately relying on WASM compatibility with your chosen language.
With containers, you can simply use a base image for your language of choice, install any dependencies you need (e.g. Gems in Ruby, Crates in Rust), copy the code across, and off you go, with all of this being orchestrated by a standard Dockerfile.
One of my favourite use cases for this, in the world of vibe coding, is the ability to run user-generated code in a sandbox for any language. Take bolt.new or v0, which allow you to create an app using AI, each time the AI makes changes, it needs to be run in a safe, sandbox environment so the end-user can see the outcome. This would work perfectly with containers, and again is not something you would be able to do with Workers.
Being able to support any language in the world naturally opens up another use case: porting existing applications from the likes of AWS, GCP and Azure. If you’re using containers already, you can lift-and-shift existing applications right over to Cloudflare, and get access to their highly performant, global network.
That’s the high-level view of what Cloudflare’s Containers are, but how do they work under the hood?
How do Cloudflare Containers Work?
This post will talk about Durable Objects a lot, which I’ve covered extensively before, so if you’re not sure what one is, I recommend reading at least the intro here before continuing!
The typical flow for deploying a container to most cloud platforms tends to follow the pattern of:
Create your Dockerfile
Build your container
Push to a registry
Deploy those containers to instances from the registry
Start the containers
So you’ll be pleased to know that’s the exact same pattern that Cloudflare has adopted. As I’ve come to enjoy with Cloudflare, it’s all wrapped up nicely for you by Wrangler, which I’ll go through later on when we go through the guide to deploying a container.
There’s actually a few pieces that combine to power containers on Cloudflare, and in terms of flow, this is how a typical request will look.
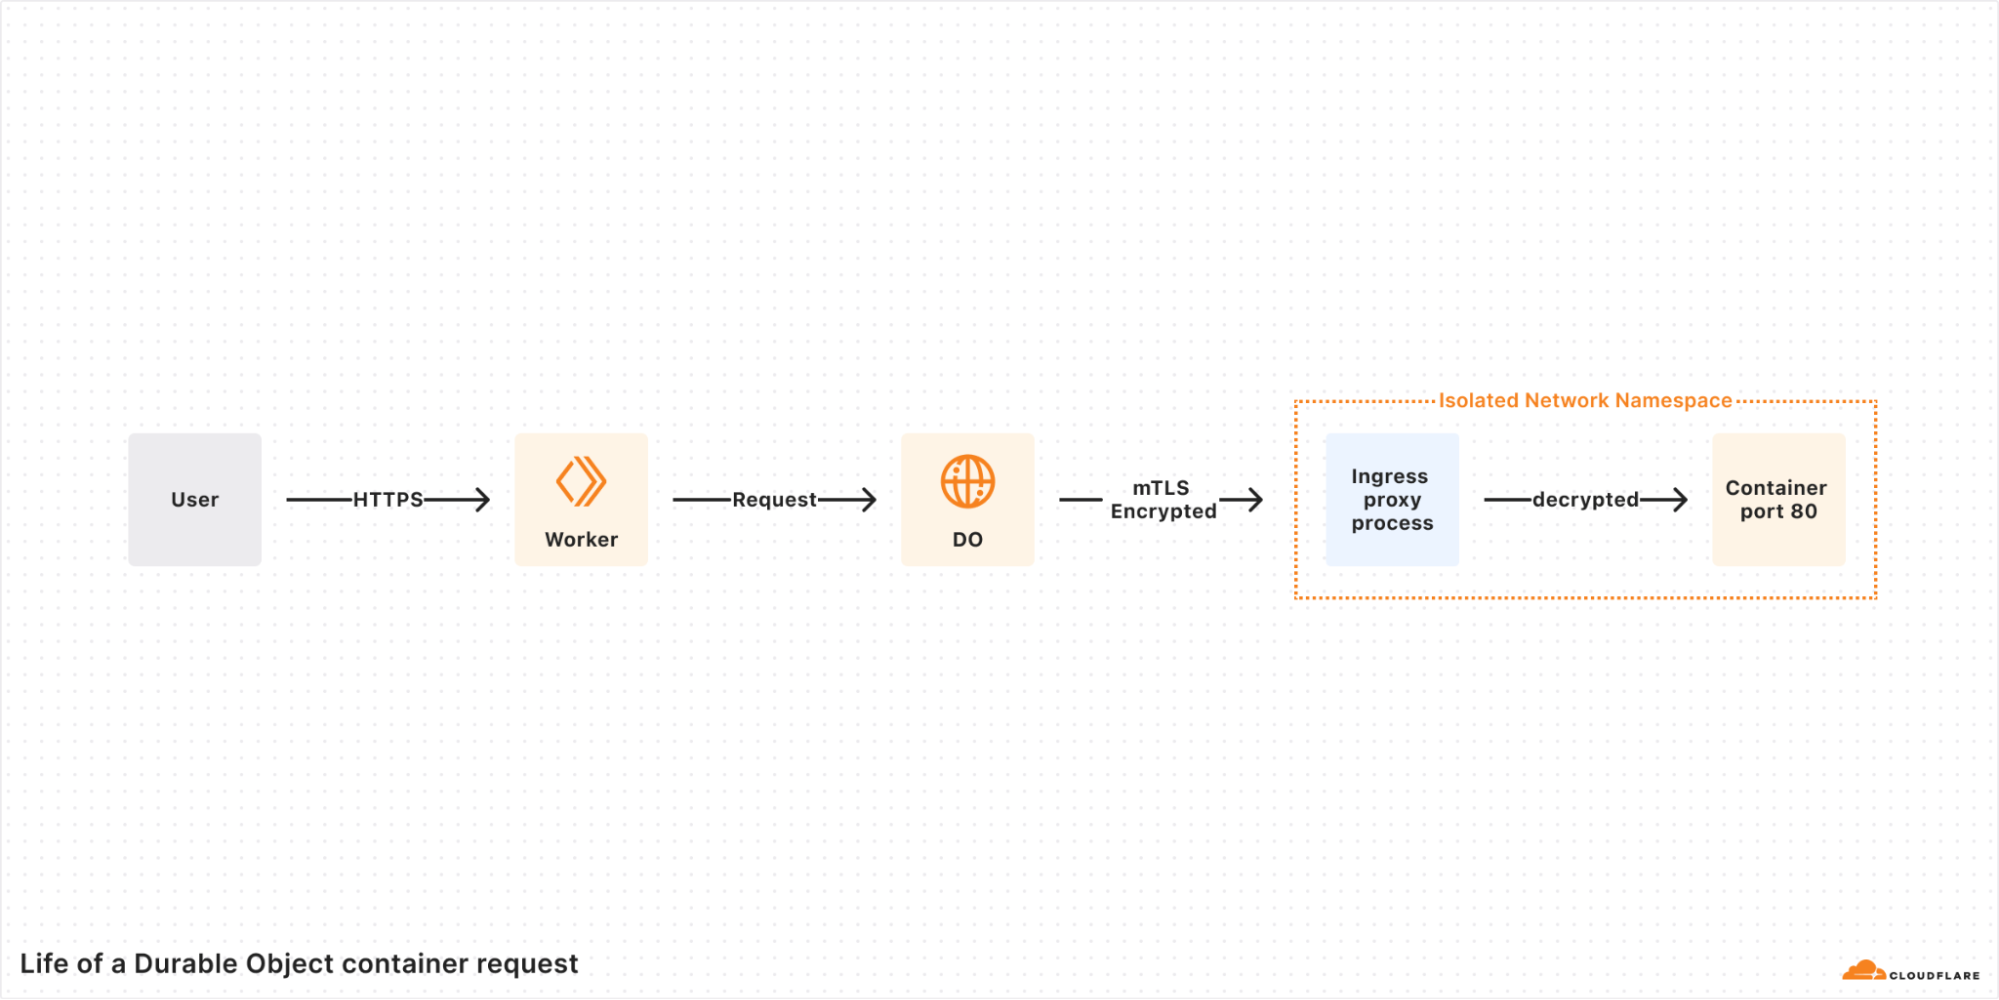
At least for now, containers on Cloudflare are only accessible via a Durable Object. Therefore, you need a Worker to front any user-facing requests that you want to hit a container.
That Worker can then request a specialised Durable Object that acts as a sidecar to a container, providing an interface to interact with that container. In the same way you can create multiple instances of a regular Durable Object, you can do the same with the specialised container-focussed Durable Objects.
This mechanism enables the dynamic scaling of containers by associating one container per Durable Object instance.
Once you’ve retrieved the Durable Object for a container, behind the scenes the container will be started, ready to serve requests. The start-up time will depend entirely on what the container needs to do to start, but a simple Node.js Express app started in around 1.5 seconds on average when I tried. Subsequent requests were then served in around 100ms to the client.
Additionally, you can define how long a container stays in memory after it serves a request. In the future, you’ll be able to enable auto-scaling, but for now, the only way to spin up containers is when they are requested, with requests being queued if necessary.
In terms of the interface the Durable Object provides, it’s relatively minimal right now but contains what you’d probably expect:
Start a container (you can opt to manually start containers, rather than have them auto-start when the Durable Object is requested)
Stop a container
Destroy a container
Exec against a container (e.g. run a Bash script)
Schedule (and unschedule) a task within the container
Hit the container with a request (using fetch)
Besides HTTP, containers are also able to handle WebSockets. The docs are pretty light on detail, but it looks like the Worker effectively forwards the request to the container.
If you want to connect from your container to outside resources, such as a database, it’s possible to pass environment variables to the container. As each container has an associated Durable Object, which has access to your bindings, you can retrieve any secrets (from Worker Secrets or Secrets Store) and pass them as environment variables.
You can define callbacks when certain things happen to your container too. For now, there’s onStart, onStop and onError.
That rounds how containers on Cloudflare work, and goes over the functionality they provide. I find it helps to see things in action to really understand how you might use containers, so I’ll go over exactly how containers work in your code next.
Get Started with Cloudflare Containers
Let’s get your first container deployed to Cloudflare. We will use a simple Express application to get started, and then you can iterate from there. If you don’t want to use Node, it will be simple enough to update the Dockerfile to the runtime of your choice.
Before you can get started, you’ll need to make sure you have two things:
Docker desktop installed on your machine, make sure it’s running too!
If you want to skip understanding how all the pieces fit together, the quickest way to deploy something right now using Containers is by running one simple command:
npm create cloudflare@latest -- --template=--template=cloudflare/templates/containers-templateThis will use a template from Mike Nomitch (Product Manager at Cloudflare for Containers) and create a project all set to deploy a container. Simply run npm run deploy after and you’ll be all set.
If you want to understand the pieces that contribute to a container-based application on Cloudflare, read on. It’s honestly pretty simple, as I’ve come to expect with Cloudflare’s developer experience.
Create a New Project
You’re not going to do everything from scratch, that would be madness. You’ll start with a basic Worker, and then bolt containers onto that project. Keep in mind containers are not publicly accessible to the internet, so you need the Worker to act as the proxy for any request you want to route to a container.
Bootstrapping a project is easy with Cloudflare, simply run the following:
npm create cloudflare@latest containers-hello-worldSelect “Hello World” from the first menu, then “Worker only” and finally “TypeScript”. You can opt to use Git if you wish, but don’t deploy your application.
Once this finishes, you’ll have a new folder named containers-hello-world containing a single Worker.
Setup an Express App
Before you can route any requests to a container, you need the actual code that will run inside the container. I picked Express purely because it’s incredibly simple to setup, and it’s fast - ensuring your cold starts are as minimal as possible.
Create a new folder at src/container and create two new files in it:
server.js
const express = require('express');
const app = express();
const port = 8080;
const host = '0.0.0.0';

app.get('/', (req, res) => {
  res.status(200).send('Hello World');
});

app.listen(port, host, () => {
  console.log(`Server is running on http://${host}:${port}`);
});
package.json
{
  "name": "hello-world-container",
  "version": "1.0.0",
  "description": "A hello world container",
  "main": "server.js",
  "scripts": {
    "start": "node server.js"
  },
  "dependencies": {
    "express": "^4.18.2"
  }
}
These two files create a simple Express application, running on Node, that will simply respond to any request with the classic Hello World message.
That’s the bootstrapping out of the way, let’s get onto the fun stuff: the containers.
Create a Dockerfile
When working with containers, the most common approach to build one is using a Dockerfile. If you’re not familiar, it’s effectively a set of instructions on how to build a container ready to serve your application - install dependencies, generate assets, and of course run your application.
Create a file named Dockerfile in the root of your project and insert the following content:
# syntax=docker/dockerfile:1

FROM node:20-alpine

# Set working directory
WORKDIR /app

# Copy package files
COPY container/package*.json ./

# Install Node.js dependencies
RUN npm install

# Copy Node.js source code
COPY container/ ./

# Expose port
EXPOSE 8080

# Run the server
CMD ["node", "server.js"]
The contents of this file will vary depending on what runtime and framework you use. In this case, we’re using an existing Docker image from Node that runs a lightweight version of Alpine Linux.
In short, someone else has done all the work necessary to prepare the environment to run Node applications, so you can just focus on the specifics of an application.
Since the application is simple, there isn’t much setup required. You simply install dependencies with npm, copy the code into the container, expose port 8080 (this is important!) and then lastly run the Express application.
You could do exactly the same with Ruby on Rails, just with a different base image, and then bundle your gems and run bundle exec rails s at the end.
As this is just a standard Dockerfile, you can build and run this container to make sure it’s working in isolation. To do so, run the following:
docker build -t containers-hw . && docker run -p 8080:8080 containers-hwThis will build your container, tag it with the name containers-hw and then run it on port 8080. Once the command has finished running, you can go to localhost:8080 in your browser and you’ll see the Hello World text on your screen.
Deploying a Container to Cloudflare
With the groundwork set, you can move onto the really fun stuff: diving into the specifics of how you can integrate containers into your Cloudflare applications and deployments.
As we’ve covered, each container deployed to Cloudflare has an associated Durable Object. Additionally, in order for Cloudflare to know about your container, that needs to be configured in the same way you would bindings in your Wrangler configuration.
Open up wrangler.jsonc in the root of your project and update it to the following:
{
  "$schema": "node_modules/wrangler/config-schema.json",
  "name": "containers-hello-world",
  "main": "src/index.ts",
  "compatibility_date": "2025-05-23",
  "compatibility_flags": [
    "nodejs_compat"
  ],
  "observability": {
    "enabled": true
  },
  "containers": [
    {
      "class_name": "NodeContainer",
      "image": "./Dockerfile",
      "max_instances": 1,
      "name": "hello-world-container"
    }
  ],
  "durable_objects": {
    "bindings": [
      {
        "class_name": "NodeContainer",
        "name": "CONTAINER"
      }
    ]
  },
  "migrations": [
    {
      "new_sqlite_classes": [
        "NodeContainer"
      ],
      "tag": "v1"
    }
  ]
}
If you’re not familiar with bindings, I highly recommend reading the documentation. In short though, bindings allow your Worker to connect to a number of resources - storage (R2), databases (D1), caches (KV) and in this case, Durable Objects.
To deploy a container to Cloudflare, you need to create a Durable Object that will map to a class that will manage your container - you’ll create that class shortly.
Additionally, you’ll notice the containers key defines the configuration for your container. As it’s an array, you can have multiple containers configured within a single project.
The important part here is that the class name is the same as what’s defined in your Durable Object binding, and of course that it points to the location of your Dockerfile.
I’ve set max_instances to 1 just so it reduces the cost, but you can set it higher if you wish. Keep in mind that this will mean all your requests route to a single container, so latency will be high from locations that are far away from your container. For a production-grade application, you’ll want to ensure this number is much higher so your containers can be spun up across the globe.
With Wrangler understanding where your container configuration is, and that you need a Durable Object, let’s create the Durable Object class that will be responsible for managing your containers.
Open up src/index.ts and update it to the following:
import { Container, getContainer } from '@cloudflare/containers';

export class NodeContainer extends Container {
  defaultPort = 8080;
  sleepAfter = '10s';

  override onStart() {
    console.log('Container successfully started');
  }

  override onStop() {
    console.log('Container successfully shut down');
  }

  override onError(error: unknown) {
    console.log('Container error:', error);
  }
}

export default {
  async fetch(request, env, ctx): Promise<Response> {
    return new Response('Hello World!');
  },
} satisfies ExportedHandler<Env>;
There’s a surprisingly small amount of code needed to interact with your containers. By adding this class, that extends a specialised type of Durable Object aptly named Container, you’ve now effectively got a sidecar for your container.
The code itself is pretty self-explanatory, with the key part being you need to make sure the port listed here matches what’s in your Dockerfile. As the name suggests, sleepAfter defines how long your containers stay in memory after handling a request. Lastly, there are a bunch of hooks you can use to handle lifecycle events of your container, such as when it starts and stops.
There’s a separate npm package for containers, so you need to add that to our application too:
npm install @cloudflare/containersYou’ll also need to update the Env interface to include your Durable Object, which you can do by simply running:
wrangler typesThis will update worker-configuration.d.ts in the root to contain the definition for your Durable Object.
With the Durable Object created, there’s just one step left: route requests from your Worker to your container!
To do so, update the fetch method in src/index.ts to the following:
export default {
  async fetch(request, env, ctx): Promise<Response> {
    const container = await getContainer(env.CONTAINER);

    return container.fetch(request);
  },
} satisfies ExportedHandler<Env>;
Once again, there’s a surprisingly small amount of code to achieve this. As someone who definitely isn’t an expert when it comes to containers, I love that all the details have been abstracted away, and the platform is doing the heavy lifting for me.
All the code needs to do is fetch an instance of your container, which is the first line, and then return the response returned from the container, which is called using fetch.
The getContainer function is a handy wrapper that effectively gets the nearest available container that’s ready to serve requests. Should no containers be available, or perhaps the nearest container might be overloaded, the request will be potentially routed further away to another location.
Because access to a container is via a Durable Object, you can also manually scale containers yourself in the same way you would a Durable Object.
Let’s say you wanted to create 3 unique container instances every time a request is handled, you could do that with the following:
env.CONTAINER.get(idOne)
env.CONTAINER.get(idTwo)
env.CONTAINER.get(idThree)
You could then call fetch on each one, and you’d have 3 requests routed to 3 unique containers. This is perfect if you want to isolate code for specific users, for example, but for traditional application traffic, you likely want to use getContainer.
There’s one more helper method that allows you to load balance, but it has some pretty severe downsides at launch. Rather than calling getContainer, you can do the following:
const containerInstance = loadBalance(env.CONTAINER, 5)
return containerInstance.fetch(request);
Here are the downsides from the docs:
We have provided the loadBalance function as a stopgap solution to route to multiple stateless container instances. It will randomly select one of N instances for each request and route to it. Unfortunately, it has two major downsides:
It requires that the user set a fixed number of instances to route to.
It will randomly select each instance, regardless of location.
We plan to fix these issues with built-in autoscaling and routing features in the near future.
Keep in mind this is an early beta, so everything isn’t perfect yet.
Okay, enough information, it’s time to deploy your container to Cloudflare’s platform. There’s no crazy commands needed, just the same command as always:
npm run deployThis will build your container, push to to Cloudflare’s registry, prepare it to serve requests and of course deploy the associated Worker and Durable Object.
Once deployed, you can go to your Cloudflare dashboard, click Containers under the Compute menu and you’ll see your list of containers.
An important note: your Worker is deployed immediately, but the containers will gradually rollout, so you’ll need to ensure any code is compatible with both versions of your new container code.
Clicking into one shows you an overview of that container

The UI will show the status of your containers, as they need to be distributed across the platform before they can be used. Initially it will show your container as provisioning, once that moves to Ready you can hit your Worker.
Hit the URL that was output in your terminal for your Worker, and watch as Hello World is served from your container 🎉
Early on in the beta, local development wasn’t possible. However, right before release, local development now works. You can try by running npm run dev, which will build your container and then serve your Worker locally as usual.
Enjoyed the article and want to get a head start developing with Cloudflare? I’ve published a book, Serverless Apps on Cloudflare, that introduces you to all of the platform’s key offerings by guiding you through building a series of applications on Cloudflare.
Buy now: eBook | Paperback
How much does a Cloudflare Container cost?
By this point, you’re probably itching to spin up some containers - I know I was when I first got access. Before you do though, let’s quickly cover the pricing for containers so you don’t wake up to a surprising bill when you throw 100 containers at it on day one.
I won’t go over the pricing for Workers and Durable Objects, but you can naturally expect to billed for those at the normal rates when interacting with containers via these products. Keep in mind, both have a generous free tier.
At launch, there will be three types of instances to choose from, that come with pre-configured memory, CPU and disk:
dev provides 256MB of memory, 1/16 vCPU and 2GB of disk space.
basic provides 1GB of memory, 1/4 vCPU and 4GB of disk space.
standard provides 4 GB of memory, 1/2 vCPU and 4GB of disk space.
You can pick which instance type you want in your Wrangler configuration.
In terms of what you pay, you’re charged for every 10ms your container runs at the following rates:
Memory: $0.0000025 per GB-second
CPU: $0.000020 per vCPU-second
Disk $0.00000007 per GB-second
This can be hard to grok in terms of how much you’ll actually end up paying. To give you a better idea, let’s say a container is running for 24 hours, you’d pay:
$0.174096 for dev
$0.672192 for basic
$1.752192 for standard
What’s Coming Next?
This is just the beta, and while containers been in development for a while, it’s a sizeable undertaking to introduce, and there will be further features added.
Here’s a quick list of what’s missing on day 1, and what to expect in the near future:
Logs from the container itself. You can’t see them in the dashboard nor Wrangler, but you can export them via Logpush if you’re an enterprise customer.
As we’ve touched on, autoscaling and proper load balancing is not available yet.
The Durable Object associated with a container is not co-located in the same location at present. They will be co-located in the future.
There’s a disconnect between Worker deploys and container deploys, they are not in sync. The Worker code will be updated immediately, but the container rollouts are slower. Again, this will be addressed in the future.
The limits are pretty low, these will be raised in the future.
Wrapping Up
That rounds out the introduction to containers on Cloudflare, hopefully you now have all the information needed to get started hacking away with your own containers.
It’s pretty early for this offering, but the developer experience and ease of getting started is really notable. It’s lacking some key features - such as autoscaling - but that’s coming in the future, alongside a bunch of other updates.
If you’ve enjoyed the article and found it useful, I’d really appreciate you giving it a share, or dropping me a comment!